Back to FAQ & Getting Started Index
Windows Live Mail
The instructions provided in this section were verified against Windows Live Mail Version 2012. They might not work with earlier or later versions of Windows Live Mail.
To set up Windows Live Mail:
- Open Windows Live Mail.
- Click Accounts > Email.
- Type
in your email address and the password you chose or you
can reset. Select the Manually configure server
settings checkbox.
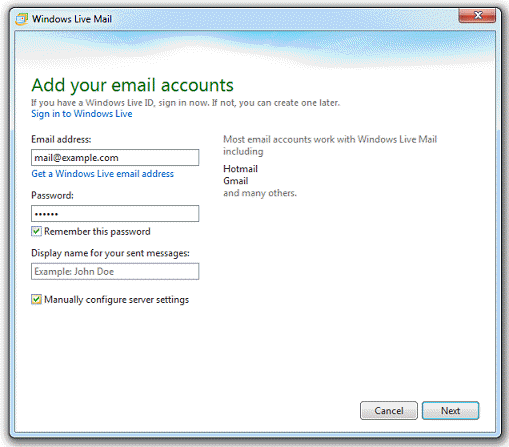
- Click
Next.
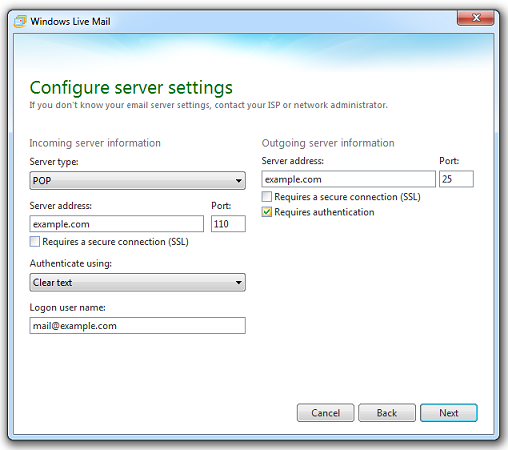
- In
the Incoming server information section specify the
following:
- Server
type. Choose POP3 or IMAP
- Server address. You're server name is in your welcome email or lookup here.
- Requires a secure connection (SSL/TLS). Select this checkbox, try unchecking if you see connection errors.
- Port:
What ports to use, see POP3 and IMAP
Ports.
- Authenticate using. Select Clear text if you are using Plesk for Windows and chose POP from the Server type menu. Otherwise select Secure Password Authentication.
- Logon user name. Type in the name of your email account, for example, mail@example.com.
- Server
type. Choose POP3 or IMAP
- In
the Outgoing server information section specify the
following:
- Server address. You're server name is in your welcome email or lookup here.
- Port. What ports to use, see POP3 and IMAP Ports
- Requires
a secure connection (SSL/TLS). Select this checkbox,
try unchecking if you see connection errors from your email app,
please adjust ports accordingly.
- Requires authentication. Select this checkbox.
- Click Next.
- Click Finish
Back to the Index